How to Enhance Clothing Photos to Drive More Sales

Great clothing photos are essential for attracting customers, increasing sales, and boosting your brand. By using the right editing techniques, tools, and expertise, you can make your product photos stand out. Well-edited images don’t just catch the eye—they help turn viewers into buyers, making them a key part of your sales success.
In this article, we’ll share expert tips on editing and enhancing your clothing photos, helping you create standout images that will boost your e-commerce sales.
How Poor Clothing Photos Affect Sales
You might think your product photos are doing fine, but properly edited images can significantly boost your sales. On the flip side, poor-quality photos can hurt your revenue and damage your brand’s reputation.
Low-quality clothing photos:
- Decrease the likelihood of making a sale and tarnish your brand’s image.
- Give the impression that the seller lacks attention to detail and quality.
- Raise doubts about the product’s value and after-sales support.
- Undermine customer trust, questioning the authenticity of your brand.

What Kind of Clothing Photos Can Drive Sales
The right photos can make a big difference in boosting your sales. Here’s a breakdown of the types of clothing photos that help drive sales:
Clear, High-Resolution Images
Use sharp, high-quality images to show off your clothing’s details and texture. Blurry photos can turn customers away.
Multiple Angles and Views
Show the front, back, and side of the clothing. Close-ups of details like zippers or stitching help customers see the full picture.
Accurate Color Representation
Ensure the color in your photos matches the actual product. This builds trust and reduces returns.
Detailed Close-ups
Highlight fabric texture, stitching, and design details. Close-ups show the quality of the clothing.
Neutral Backgrounds
Use simple, clean backgrounds to keep the focus on the clothing. Avoid distractions.
Enhance Clothing Photos to Drive More Sales (7 Tips)
A Summary of 7 Tips
- Enhance Colors for a Natural Look
- Remove Unwanted Background Items
- Use Natural Lighting
- Sharpen Images for Clarity
- Remove Grains for Clean, Vibrant Photos
- Adjust Tone, Brightness, and Contrast
- Apply HDR for Balanced Highlights and Shadows
#1. Enhance Colors for a Natural Look
Colors can make or break a product photo. While it's tempting to over-saturate or manipulate colors to make the product look more eye-catching, it's important to stay true to the item’s actual hue. Adjust the saturation and vibrancy just enough to enhance the natural tones without misleading customers. This ensures that the clothing looks as close to real life as possible, reducing the likelihood of returns and fostering trust. Focus on bringing out the fabric’s colors, like the richness of a denim jacket or the vibrancy of a red dress, without making them look unrealistic.

#2. Remove Unwanted Background Items
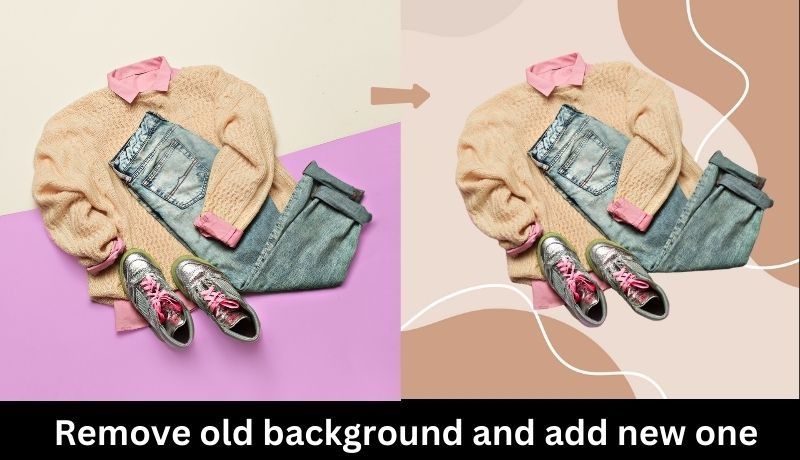
A cluttered or distracting background can take attention away from the product. Whether it’s a random object or an overly busy environment, these distractions can confuse or even annoy potential buyers. Using editing tools like an AI Background Remover, you can easily get rid of unwanted backgrounds and make your photos clean and focused.
Follow these simple steps to remove background from clothing photos:
- Visit the imglarger website and access the AI Background Remover Tool.
- Drag or drop an image to the tool in JPG, PNG, or WebP format.
- Click the Upload & Start button to remove the image background instantly.
- Once done, you’ll get the image with a transparent background.
After removing the background, you can either place the clothing on a clean white background or create a version with a transparent one. Transparent backgrounds are ideal for websites with custom color schemes, allowing your product images to blend seamlessly with the site design.
Alternatively, you can use a subtle off-white shade, like the one used by the sustainable brand People Tree. This helps your product stand out against a white online store backdrop, giving it a unique and appealing look.

Also read: How to Use AI to Remove Background From Images Online
#3. Use Natural Lighting
Natural light is one of the best ways to capture authentic, eye-catching product photos. Unlike artificial lighting, which can create unnatural shine or distort colors, soft, diffused natural light—like the light coming from a window during the day—brings out the true texture and color of clothing without harsh shadows or overexposure.
To get the best results, shoot near a large window indoors or outdoors on a cloudy day. This will make the product look fresh and vibrant, attracting potential buyers.
For example, imagine photographing a black leather jacket under harsh overhead lighting. The lighting causes unappealing shadows, making the jacket appear dull and the fabric details unclear. But with soft, natural light, the jacket would look vibrant, showcasing its texture and sheen—giving it a high-quality, inviting look that encourages sales. This highlights how poor lighting can affect even the best products.
One of the simple ways to enhance clothing photos is optimizing the light and brightness. This can be done with an AI photo enhancement tool like imglarger’s AI Image Enhancer.

Follow these steps to automatically correct your photo’s brightness:
- Open the Imglarger website and select the AI Image Enhancer from the navigation bar.
- Upload your clothing image in JPG, PNG, or WebP format by dragging or dropping it into the tool.
- Click the “Upload & Start” button to begin enhancing the brightness.
- In just a few seconds, your photo will be optimized, with improved color, contrast, and brightness.
#4. Sharpen Images for Clarity
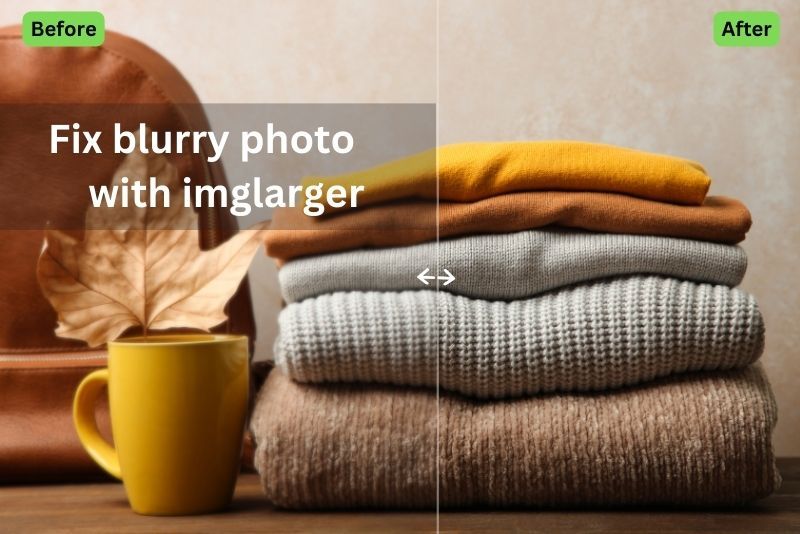
Blurry images make clothing look unprofessional and difficult to evaluate. When your customers can’t see the fine details of the product, such as the fabric texture, stitching, or buttons, they might hesitate to buy.
Use sharpening tools to fix blurry photos and enhance their clarity. Make sure to sharpen the details without overdoing it, as this can cause unwanted noise or artifacts.

Follow these steps to sharpen a blurry clothing photo:
- Go to the Imglarger website and select the AI Image Sharpener from the navigation bar.
- Upload your clothing image in JPG, PNG, or WebP format by dragging or dropping it into the tool.
- Click the "Upload & Start" button to begin the sharpening process.
- After a few seconds, your photo will be enhanced, showing sharper details and improved clarity.
A well-sharpened image will highlight the quality of the clothing and give buyers the confidence they need to make a purchase.
#5. Remove Grains for Clean, Vibrant Photos
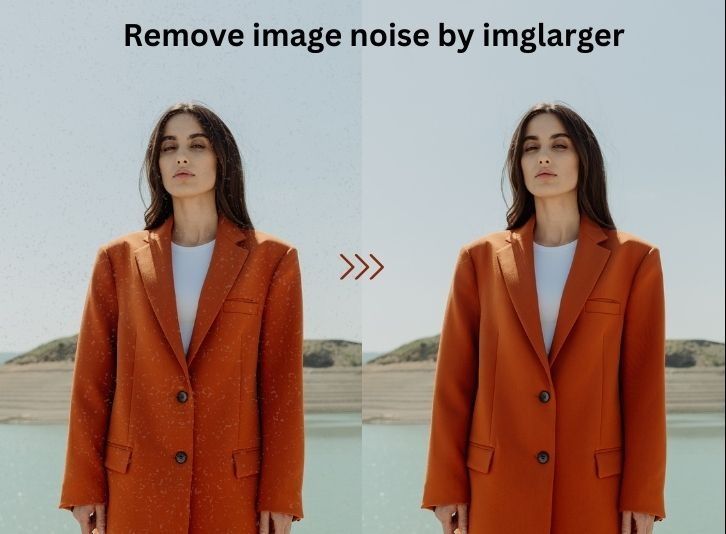
Grainy or pixelated images can undermine the quality of your product photos and make them look less polished. Digital noise often occurs in low-light conditions or when an image is cropped or resized too much.
To remove noise, use editing software’s noise reduction tools to smooth out the grainy texture, which will result in cleaner, crisper photos. Imglarger’s AI Image Denoiser is a simple and free tool to help remove noise and grain from your photos without affecting the surroundings and the background.

Here’s how to remove noise and grain with imglarger.
- Visit the Imglarger website and select the AI Image Denoiser from the navigation bar.
- Upload your clothing image in JPG, PNG, or WebP format by dragging or dropping it into the tool.
- Start the process of noise reduction by clicking the “Upload & Start” button.
- Wait for a few seconds until the noise reduction process is finished. You’ll find the image is clearer and cleaner now.
Removing these imperfections will make your clothing look more vibrant and professional, helping to boost your brand’s image and increase customer trust.
#6. Apply HDR for Balanced Highlights and Shadows
High Dynamic Range (HDR) is a technique used to balance the highlights and shadows in an image, especially in high-contrast situations where one part of the photo may be too bright and another too dark. This effect ensures that all parts of the image are visible and balanced, providing more detail throughout.
HDR can bring out the best in your clothing by ensuring the texture, color, and shape are visible in both light and shadow areas. This technique helps create more professional, visually stunning images that better showcase your product, increasing its appeal to potential buyers.
#7. Remove Props from Clothing Photos
Props can be a fun addition to lifestyle photos, but when it comes to product photography, they can distract from the main focus—your clothing. Items like bags, jewelry, shoes, or even brand tags can take attention away from the garments you're showcasing. While props may seem like a way to enhance the scene, they often compete with the clothing for the viewer’s focus, making the image feel crowded and less professional.
To make your clothing photos stand out, it’s important to remove any unnecessary props. By doing this, you ensure that the garment is the center of attention, making it easier for potential buyers to envision themselves wearing it.

Follow these simple steps to remove props from photos:
- Visit the Object Remover website and upload your image.
- Mark the areas you want to remove by drawing over any props that may affect the quality of your photo. This can include items like bags, shoes, brand logos, hangers, patterns, or any other distractions that draw attention away from the clothing.
- Adjust the brush size using the slider to ensure you’re accurately selecting the areas to be removed.
- Once you're happy with your selection, click the "Remove Objects" button. The tool will instantly erase the unwanted props, leaving no trace behind.
A free website like Object Remover can help you quickly eliminate unwanted props from your photos. With just a few clicks, you can clean up your pictures, ensuring that your clothing is the star of the show. This simple step can make your photos more polished and appealing, ultimately driving more sales.
Drive More Sales with Enhanced Clothing Photos
In this article, we’ve shared actionable tips to help you improve your clothing photos, including enhancing colors, removing distractions, using natural light, sharpening images, and more. With the right approach, you can create stunning visuals that showcase your clothing and build trust with potential customers.
To maximize your sales, remember that every detail counts. From eliminating props and background distractions to adjusting brightness and contrast, enhancing your photos is an investment in your brand’s success. By following these tips, you’ll be able to present your clothing in the most flattering way possible, encouraging more purchases and ultimately driving more sales for your online store.